Skip to content
🚀 Limited-time offer $130 for Lifetime Pro access. Buy once and use forever

Status List

Uptime & Status Pages

NGINX

Contents

metrics dashboard

How to Set Up the Built-in NGINX Status Page

Own a website, want to get alerts when it’s not working?
Consider trying out Status List for free. We have thousands of less-stressed customers who rely on us.

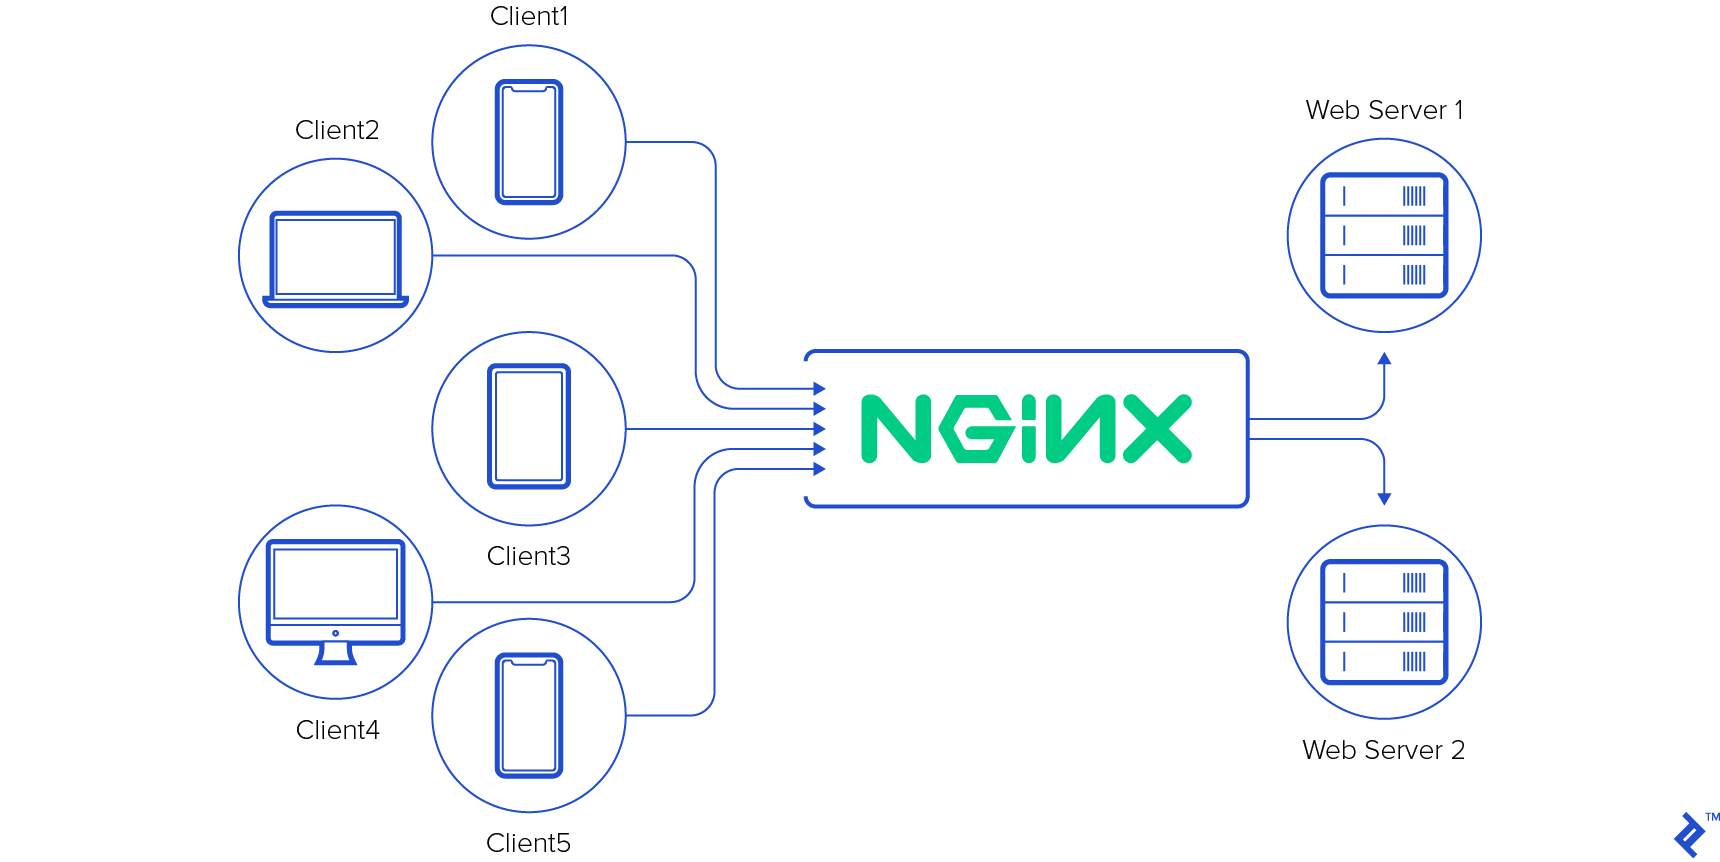
NGINX is a high performance, event-based web server and reverse proxy. Many critical applications use NGINX to serve interface their content with staff and customers. It’s really important to monitor NGINX for errors and performance bottle necks. If there’s an issue connecting to your application, you want to be on top of it right away!

Prerequisites

Before you get started, you’ll need NGINX installed and configured on your system. You can read our NGINX setup guide if you need help with that.

Enabling the ngx_http_stub_status_module

The built-in NGINX status page relies on the ngx_http_stub_status_module. Let’s walk through getting that module installed and enabled.

You can check if the ngx_http_stub_status_module is enabled by running the following command:

				
					 nginx -V 2>&1 | grep -o "with-http_stub_status_module"


If you see a grep match output containing http_stub_status_module, then your module is already installed and you can skip ahead.

To install the ngx_http_stub_status_module, we’ll need to re-install NGINX with the necessary modules. Most package mangers offer a nginx-full package which contains the ngx_http_stub_status_module. On Ubuntu, you can run the following command to install it:

				
					apt-get install nginx-full


You can also re-compile from source and include the –with-http_stub_status_module parameter.

Configuring NGINX Status Page

Let’s configure your status page. Open up your NGINX configuration file (usually located at /etc/nginx/nginx.conf).

Create the Default Server Block

Check through your NGINX config for a default_server block. If you do not have one yet, let’s create one. Paste the following block into your http configuration block.

				
					server {
    listen       80;
    listen       [::]:80;
    server_name  _; # catch-all domain
    root         /usr/share/nginx/html;

    # Load configuration files for the default server block.
    include /etc/nginx/default.d/*.conf;

    error_page 404 /404.html;
        location = /404.html {
    }

    error_page 500 502 503 504 /50x.html;
        location = /50x.html {
    }
}


Ready to know about downtime before your customers?
 
Status List delivers uptime monitoring and professional hosted status pages for sites of all shapes and sizes.

Trusted by 1000+ companies

Add stub_status Location Block

Next, we need to define a location block for our stub_status module. The location block will allow us define an HTTP path for our status page and restrict access.

In your default server block, add the following location block:

				
					location /nginx/status {
    stub_status;
}


Restrict Access to NGINX Status Page

The information on your status page is sensitive and could be used by an attacker to compromise your system. It’s important to restrict the IP addresses that can view your status page. Let’s add some allow/deny directives to our location block to lock it down.

In your status page location block add the following allow/deny lines:

				
					location /nginx/status {
    stub_status;
    allow 127.0.0.1;
    deny all;
}


*You may want to allow internal networks to access this page. You can do that by adding an additional line: allow 10.0.0.0/8;

Save and Test NGINX Config

Let’s apply your changes and make sure everything works correctly. Save your NGINX config file.

Before we restart the NGINX server, let’s test our configuration to make sure we didn’t make any mistakes. Run the following command and fix any syntax errors:

				
					nginx -t


Once your configuration passes the tests, let’s restart the NGINX server to apply the changes.

				
					nginx -s reload


Accessing NGINX Status Page

There’s a few ways to access the NGINX status page. You use a web browser or a command line tool like curl

To view the status page in your browser, open a window to 127.0.0.1/nginx/status. You should see something that looks like this:

nginx status page

To view the status page using curl, you can run the following command:

				
					curl http://127.0.0.1:80/nginx/status


Interpreting the NGINX Status Page

The NGINX status page doesn’t provide very much detail other than some numbers. Let’s explore what these numbers mean.

  1. Active Connections: This is the number of client connections that are currently in-progress or waiting to be processed.
  2. Accepts: The number of client connections accepted since the server was started. (This is the first number under the word “server”).
  3. Handled: The number of client connections that were processed since the server started. Typically this will be the same as the Accepts value unless some requests were dropped. Requests may be dropped due to resource and queue constraints.
  4. Requests: The number of client requests processed since the server was started.
  5. Reading: The number of active connections where NGINX is reading the headers.
  6. Writing: The number of active connections where NGINX is writing content to the client.
  7. Waiting: The number of  active connections where NGINX is waiting for a response from upstream or the file system.
Ready to know about downtime before your customers?
 
Status List delivers uptime monitoring and professional hosted status pages for sites of all shapes and sizes.

Trusted by 1000+ companies

Integrating NGINX Status with Monitoring Tools

NGINX is a critical component in the chain of applications that make your app work. We need to monitor NGINX to know when it’s broken or degrading. Depending on your system, there are few ways to set up this integration.

DataDog

Edit your nginx.d/conf.yaml file. Set the nginx_status_url parameter to http://127.0.0.1:80/nginx/status. Restart your DataDog agent and you’re off to the races!

Read more at the official DataDog docs

Uptime Monitor (Generic)

It’s really easy to setup an NGINX check on your uptime monitoring service.

  1. Determine what source IPs your uptime service uses to check your app.
  2. Edit your /nginx/status block and include an allow <insert-iptime-ips>;
  3. Restart your NGINX server
  4. Add an HTTP monitor to your uptime dashboard for http://<mydomain>/nginx/status.

Conclusion

We have our NGINX status page setup using the ngx_http_stub_status_module. We can see how well NGINX is performing under the current load independent of our other components. It’s so important to keep an eye on NGINX. It’s one of the critical components in our application. Now we know when NGINX is having trouble and we need to intervene. 

If you have NGINX Plus, you may be interested in the ngx_http_api_module where you can also setup more complex status pages.

You may also enjoy our article on NGINX variables and how do complex routing.

You may also enjoy

NGINX is fairly straightforward to install and provides a lot of punch right out of the box. Let's dive in and get started!
NGINX makes it easy to run Laravel on a production web server. The setup has a few steps, but it's pretty straight forward. Let's get your app into production!
The server_name config directive tells NGINX how to route client requests. server_name can match multiple domains, split out requests and work on localhost.
Learn to set up the NGINX status page with for real-time server performance monitoring and seamless integration. Let's get your status page up and running!
Config variables are a powerful tool to control how NGINX routes requests. HTTP request, header and env variables give us precise control on request routing.
It's important to test your NGINX configuration to prevent downtime. Fortunately it's really easy to test your configuration before reloading.

Contents

metrics dashboard

How to use NGINX Variables + Reference List

Own a website, want to get alerts when it’s not working?
Consider trying out Status List for free. We have thousands of less-stressed customers who rely on us.

Config variables are a powerful tool to control how NGINX routes requests. HTTP request, header and env variables give us precise control on how requests are routed. Let’s dig in!

Using NGINX Config Variables

Configuration variables are typically used in the server block of the NGINX config file. We can use if statements and variables to control how a request is routed within NGINX. Here’s a simple example of what we’re talking about:

				
					server {
    listen 80;
    
    # check host
    if ($host = www.mydomain.com) {
        # remove www by redirecting
        return 301 http://mydomain.com$request_uri;
    }
    
    # send request to backend
    location / {
        proxy_pass http://backend;
    }
}


In the example above, we check the host variable (a built-in NGINX variable) and route the request either to a redirect or to our backend. This is just a simple example. We can build incredibly complex algorithms with these simple building blocks.

Let’s walk through the variables available to us.

Request Variables

NGINX provides access to almost every aspect of the HTTP request as variables that we can use in our routing logic.
Variable Description Example
$remote_addr The http client’s public ip 210.39.293.293
$request_length Tells us how long the the request is. This includes the headers and request body. 2930 (bytes)
$content_length Similar to $request_length, but only has the length of the request body 2000 (bytes)
$request_method The type of HTTP request received (GET/POST/PUT/DELETE) GET

Here’s an example of request-based request routing:

				
					server {
    location / {
        proxy_pass http://backend/$request_method$request_uri
        proxy_set_header X-RemoteIP $request_addr;
    }
}


In this example we’re re-writing the request path and setting a header before sending the request to our backend.

The proxy_pass line is pre-appending the request method to the request. This could be useful if your backend didn’t have access to the HTTP method, or wanted to use path-only based routing. (e.g. /post/companies, /get/companies)

The proxy_set_header line is adding an HTTP header with the client’s IP address. This way the backend can still access the client’s IP address even though it’s behind a load balancer. (You could also use the X-ForwardedFor header here, there’s a great write up on the NGINX blog about that)

Ready to know about downtime before your customers?
 
Status List delivers uptime monitoring and professional hosted status pages for sites of all shapes and sizes.

Trusted by 1000+ companies

HTTP Header Variables

Predefined NGINX variables allow us to access the HTTP header values as well. 

Variable Description Example
$content_type The Content-Type http header application/json
$http_user_agent The http client’s user agent (User-Agent Header) Mozilla/5.0 (Macintosh; Intel Mac OS X 10_15_7) AppleWebKit/537.36 (KHTML, like Gecko) Chrome/111.0.0.0 Safari/537.36
$cookie_{name} The value of the HTTP cookie with the given name (e.g. $cookie_auth) cookie-value
$http_{name} The HTTP header at {name} (e.g. Authorization) Bearer 31d728c8-7141-42d1-a07d-77e26fac400b

Here’s an example of header-based routing:

				
					server {
    if ($http_user_agent ~ Bot) {
        return 403 "Bots are forbidden";
    }
    
    if ($http_authorization = "") {
        return 403 "Missing bearer token";
    }
    
    location / {
        proxy_pass http://backend$uri?$query_string&auth=$http_authorization
    }
}


In this example, we’re blocking out bad requests and moving the Authorization header into the query string. The Bot check and missing Authorization HTTP header will simply block the request with a 403 response. Requests that meet our requirements will be forward on. In the requests that we forward, we extract the Authorization header and append it to the query string. This can be useful if your backend doesn’t want to touch HTTP Headers, but is able to access the query string.

Location Variables

Location variables allow us to access URI properties. This is really useful for path and query-based routing and redirecting. Here are a few commonly used built-in variables.

Variable Name Description Example
$request_uri The full requested path with query string //contact?ref=gas
$uri A normalized version of $request_uri. (e.g. double slashes converted to single slash) This value will change during redirects or rewriting. /contact
$scheme The request scheme (http/https) https
$query_string (aka $args) The query portion of the URL (without the leading ?) search=hello&user=3920
$arg_{name} The value of a specific query field (e.g. $arg_search) hello
$host The value of the Host header mydomain.com:9403
$hostname Similar to $host, but doesn’t include the port number mydomain.com

Here’s an example of location based routing:

				
					server {
    
    if ($arg_search != "") {
        rewrite ^(.*)$ /search/$arg_search break;
    }
    
    if ($uri = /contact) {
        return 301 /new-contact-page;
    }
}


In this example we’re re-routing searches and the contact page. If any query contains the search field, we rewrite the URI to use the /search endpoint. In the second part, we’re creating a static redirect for the /contact page. 

Upstream Variables

We can also access variables based on the upstream response. Here is a table of commonly used upstream variables:
$upstream_response_time Measures how long the backend took to process the request 3.293 (seconds)
$upstream_queue_time Measures how long this request waited in the queue before being processed by the backend 1.203 (seconds)
$upstream_status The HTTP status code returned by the backend 200
$upstream_addr The backend address used for this request 10.0.0.2:3029

Here’s an example of how we might use upstream variables:

				
					server {
    location / {
        proxy_pass http://backend;
        
        add_header X-BackendTime $upstream_response_time;
        add_header X-BackendUsed $upstream_addr;
    }
}


In this example, we’re adding some diagnostic metrics to our HTTP response header. We add the backend used and how long it took for that backend to process the request. This type of information can be really helpful in tracking down production issues.

Map Variables

Maps are a great way to deal with lookup tables. For example, if we have a set of redirects we’d like to make, we can use a map. NGINX will evaluate the lookup in the background and we can access it as a single variable. Here’s an example

				
					# redirection table
map $uri $redirected_uri {
    / /index.html
    /cntact /contact
    /pricing /contact-sales
}
    
server {
    if ($redirected_uri) {
        rewrite ^ $redirected_uri;
    }
}


Environment Variables

Environment variables are really helpful when we need to spin up multiple NGINX instances. We can use variables to inject host names, domain names and backend information into our configuration. Unfortunately NGINX doesn’t support environment variables on it’s own. But, we can get around that problem with templating.

Templating is where we create an NGINX configuration file, but use bash variables to inject our environment variables. Here’s an example:

				
					cat /etc/nginx/nginx.template.conf
http {
    server {
        server_name ${DOMAIN}
        listen ${PORT};
        
        location / {
            proxy_pass http://${BACKEND};
        }
    }
}


We can take that template and run it through something like envsubstr to generate our actual configuration. 

				
					envsubstr < /etc/nginx/nginx.template.conf > /etc/nginx/nginx.conf


Our nginx.conf will now contain our “rendered” configuration.

Set Variables

We can also create user-defined variables using the set directive. This can be useful for extracting request details and reconstructing the request. You can use the set directive similar to how we use the rewrite/return directives. Here’s an example:

				
					server {
    set $uid 0;
    if ($uri ~ "^/([0-9]+)/") {
        set $uid $1;
    }
    
    location / {
        proxy_pass http://backend;
        proxy_set_header X-UserId $uid;
    }
}


In this example, we extract the user’s id for the backend. First we check if the URI has the format that contains a UID. Then we extract that UID and add it to the X-UserId header. That X-UserId header is then passed to the backend.

Full Variable Reference

You can find the full NGINX variable reference here.

You may also enjoy

The server_name config directive tells NGINX how to route client requests. server_name can match multiple domains, split out requests and work on localhost.
Learn to set up the NGINX status page with for real-time server performance monitoring and seamless integration. Let's get your status page up and running!
It's important to test your NGINX configuration to prevent downtime. Fortunately it's really easy to test your configuration before reloading.
NGINX makes it easy to run Laravel on a production web server. The setup has a few steps, but it's pretty straight forward. Let's get your app into production!
NGINX is fairly straightforward to install and provides a lot of punch right out of the box. Let's dive in and get started!
Config variables are a powerful tool to control how NGINX routes requests. HTTP request, header and env variables give us precise control on request routing.

Contents

metrics dashboard

NGINX server_name: How to use it, Where you need it​

Own a website, want to get alerts when it’s not working?
Consider trying out Status List for free. We have thousands of less-stressed customers who rely on us.

The server_name config directive tells NGINX how to route client requests. We can use server_name to match multiple domains, split out IP-based requests and work on localhost.

What server_name does

server_name helps NGINX route requests between multiple server blocks. Server blocks allow you to define backend services and specific ways to handle those requests. The server_name tells NGINX which server block to use.

This directive is really useful for SSL termination and domain based routing. For example, you may want to serve your static files from static.mydomain.com with specific compression settings. But, you may want different compression settings for api.mydomain.com. Server_name can help you with this.

server_name is not required

You can ignore the server_name directive if you wish. This is useful when you don’t need  domain routing or you only have one backend service. If you omit the server_name directive, NGINX will simply use the first server block.

server_name _ (underscore)

You can also set server_name to “_”. This is basically the same as omitting the server_name directive. It will mark this server block as the catch-all block.

Using server_name for localhost

For local development or machine tests, you can define a localhost server_name. Any requests to localhost or 127.0.0.1 will be routed to this server block. Here’s an example of how to do this:

				
					server {
    server_name: 127.0.0.1 localhost;
}
				
			
Ready to know about downtime before your customers?
 
Status List delivers uptime monitoring and professional hosted status pages for sites of all shapes and sizes.

Trusted by 1000+ companies

Using server_name for multiple domains

You can define multiple domains in your server_name directive. Simply list your domains with spaces or newlines between each domain. Don’t forget to end your directive with a semicolon. Here’s an example:

				
					server {
    server_name: mydomain.com api.mydomain.com;
}

server {
    server_name: 
        static.mydomain.com 
        redirects.mydomain.com;
}


Using server_name wildcards

You can also use wildcards. This allows us to match multiple domains without having to explicitly list them. For example you could set your server_name to *.mydomain.com instead of app.mydomain.com api.mydomain.com static.mydomain.com.

Wildcards only work at the start or end of the domain name (e.g. *.domain.com or domain.*). You can’t put a wildcard in the middle of the domain name. For that you will need to use a regular expression.

Using server_name regular expressions

NGINX also supports PCRE compatible regex for the server_name. You can write your regular expressions just like you would a domain name. If you want to enter multiple regular expressions, just add them with a space separating each expression. Here’s a few examples:

				
					server {
    server_name ^www\..+\.mydomain\.com$
            ^static\.my.+\.com$;
}


Using server_name IP Addresses

You can enter IP addresses in the server_name block. IP addresses will match requests where the Host field is an IP address (e.g. http://10.0.0.23/myfile.html). For example:

				
					server {
    server_name 10.0.0.2;
}


You may also enjoy

NGINX makes it easy to run Laravel on a production web server. The setup has a few steps, but it's pretty straight forward. Let's get your app into production!
NGINX is fairly straightforward to install and provides a lot of punch right out of the box. Let's dive in and get started!
The server_name config directive tells NGINX how to route client requests. server_name can match multiple domains, split out requests and work on localhost.
It's important to test your NGINX configuration to prevent downtime. Fortunately it's really easy to test your configuration before reloading.
Learn to set up the NGINX status page with for real-time server performance monitoring and seamless integration. Let's get your status page up and running!
Config variables are a powerful tool to control how NGINX routes requests. HTTP request, header and env variables give us precise control on request routing.

Contents

nginx logo

How to Test NGINX Config

Own a website, want to get alerts when it’s not working?
Consider trying out Status List for free. We have thousands of less-stressed customers who rely on us.

It’s important to test your NGINX configuration to prevent downtime. If you make a syntax error, your restart will fail and your site will go down. Fortunately it’s really easy to test your configuration before reloading.

Test Default Config

				
					> nginx -t
nginx: the configuration file /etc/nginx/nginx.conf syntax is ok
nginx: configuration file /etc/nginx/nginx.conf test is successful


The NGINX command will test the default configuration files without affecting your NGINX service. You receive error information and details on which files were checked.

Config Errors

If NGINX detects an error in your configuration file, you will get output like the following:

				
					> nginx -t
nginx: [emerg] unexpected "}" in /etc/nginx/nginx.conf:119
nginx: configuration file /etc/nginx/nginx.conf test failed


This error tells us there is something unexpected at /etc/nginx/nginx.conf on line 119. If we open that file we should be able to track down the issue and try again.

Common Errors

There are few things to check when you get an error:

  1. Missing braces: This is one of the most common issues. Ensure each block has an opening and closing brace. For example, ensure your server block starts with a brace and ends with one.
  2. Missing semicolon: Each of your directives (e.g. server_name) should end with a semicolon. It’s just like writing C code.
Ready to know about downtime before your customers?
 
Status List delivers uptime monitoring and professional hosted status pages for sites of all shapes and sizes.

Trusted by 1000+ companies

Testing Custom Config File

You can also test config files in non-standard locations. This can be especially helpful if you’re running Docker. Simply pass the “-c” option to your NGINX command. See below for an example:

				
					> nginx -t -c /opt/mynginx.conf
nginx: the configuration file /opt/mynginx.conf syntax is ok
nginx: configuration file /opt/mynginx.conf test is successful


You may also enjoy

NGINX makes it easy to run Laravel on a production web server. The setup has a few steps, but it's pretty straight forward. Let's get your app into production!
It's important to test your NGINX configuration to prevent downtime. Fortunately it's really easy to test your configuration before reloading.
The server_name config directive tells NGINX how to route client requests. server_name can match multiple domains, split out requests and work on localhost.
Config variables are a powerful tool to control how NGINX routes requests. HTTP request, header and env variables give us precise control on request routing.
NGINX is fairly straightforward to install and provides a lot of punch right out of the box. Let's dive in and get started!
Learn to set up the NGINX status page with for real-time server performance monitoring and seamless integration. Let's get your status page up and running!

NGINX + Laravel Setup Guide

nginx + laravel

NGINX makes it easy to run Laravel on a production web server. The setup has a few steps, but it’s pretty straight forward. Let’s get your app off into production!

The Laravel config is like any other PHP web application. We need a web server (NGINX) and a php runtime (PHP-FPM).

Note: you will still need to setup your database and other services after this guide.

Contents

Install Packages

First, let’s install NGINX and PHP-FPM. Pull out your favorite package manager and run the install command. Here’s an example using yum:

				
					yum install -y nginx php-fpm php
php -v


If you want a particular version of php, you may need to modify your install command to include the version (e.g. yum install -y php8.1)

We also need to install some php extras for Laravel. We need the following extra packages: 

  • Ctype
  • CURL
  • DOM
  • FileInfo
  • Filter
  • Hash
  • Mbstring
  • OpenSSL
  • PCRE
  • PDO
  • Session
  • Tokenizer
  • XML

Here’s a command to install those extras:

				
					yum install -y php-ctype php-curl php-dom php-fileinfo php-filter php-hash php-mbstring php-openssl php-pcre php-pdo php-session php-tokenizer php-xml


Setup PHP-FPM

Let’s get PHP-FPM setup and ready to go. By default PHP-FPM will create a www worker pool. Let’s check that pool is configured correctly. Open the the configuration file at /etc/php-fpm.d/www.conf. Verify the listen property is set to listen = /run/php-fpm/www.sock. If you have another unix socket path here, that’s ok – just take note of it.

Let’s start up the PHP-FPM service. Run the command service php-fpm start. You should see the service and worker pool running. You may also want to set the service to auto-start on boot. You can use the following command to enable auto-start: systemctl enable php-fpm.

Ready to know about downtime before your customers?
 
Status List delivers uptime monitoring and professional hosted status pages for sites of all shapes and sizes.

Trusted by 1000+ companies

Setup Laravel

Laravel needs a little tweaking for the production environment. I’m going to assume you’ve cloned your application files and setup your .env file already. Let’s run a few optimizations for Laravel. 

First, we’ll optimize the autoloader. This will improve response time by optimizing the lookup map for production use. Run the following in your application folder:

				
					composer install --optimize-autoloader --no-dev


Second, we’ll optimize your configuration files. This will combine all your configurations into a single file for Laravel to load. You’ll need to run this command after each update deployment. Run the following in your application folder:

				
					php artisan config:cache


Finally, if you have lots of routes or views, you’ll want to run the following optimizations: 

				
					php artisan route:cache
php artisan view:cache


Setup NGINX

NGINX needs a little bit of direction to connect PHP-FPM and your Laravel site. For more configuration details, you may want to check out our NGINX Configuration Guide.

Create a new site for NGINX by making a new config file at /etc/nginx/site-available/mysite.com.conf. Create a server block that listens on port 80. Add a location block for .php that directs requests to our PHP-FPM unix socket. See below for a full example:

				
					server {
    listen 80;
    listen [::]:80;
    server_name mysite.com;
    root /opt/mysite.com/public;
 
    add_header X-Frame-Options "SAMEORIGIN";
    add_header X-Content-Type-Options "nosniff";
 
    index index.php;
 
    charset utf-8;
 
    location / {
        try_files $uri $uri/ /index.php?$query_string;
    }
 
    location = /favicon.ico { access_log off; log_not_found off; }
    location = /robots.txt  { access_log off; log_not_found off; }
 
    error_page 404 /index.php;
 
    location ~ \.php$ {
        fastcgi_pass unix:/run/php-fpm/www.sock; # if you have a different php-fpm socket path, enter it here
        fastcgi_param SCRIPT_FILENAME $realpath_root$fastcgi_script_name;
        include fastcgi_params;
    }
 
    location ~ /\.(?!well-known).* {
        deny all;
    }
}


Test NGINX Config

Check that your configuration is ok using the nginx -t command. If there are any syntax errors, please fix them.

Putting it all together

Let’s check if everything is working. Start the NGINX service (service nginx start). Open up your browser and access your site. You should see your Laravel home page loaded up.

Don’t forget to setup your database and other services if you need those.

Next Steps

Contents

nginx logo

NGINX Configuration Guide

Own a website, want to get alerts when it’s not working?
Consider trying out Status List for free. We have thousands of less-stressed customers who rely on us.

  • What is NGINX?

    NGINX is a high efficiency load balancer, request manipulator and static file server. The high efficiency comes from it's event-based architecture (as opposed to competing threaded or process-driven approaches).

NGINX is fairly straightforward to install and provides a lot of punch right out of the box. Let’s dive in and get started!

Quickstart

Install the NGINX package from your favorite package manager. Here’s an example with yum:

				
					yum install -y nginx


Create a directory at /etc/nginx/sites-available and /etc/nginx/sites-enabled for our site-specific configurations.

Open the configuration file created in /etc/nginx/nginx.conf. Include the following line at the end of the http {} configuration block: 

				
					include /etc/nginx/sites-enabled/*;


Start your NGINX service using the service start command. Configure nginx to auto-start using chkconfig on.

				
					service nginx start
chkconfig nginx on
				
			
Ready to know about downtime before your customers?
 
Status List delivers uptime monitoring and professional hosted status pages for sites of all shapes and sizes.

Trusted by 1000+ companies

Adding a Site

Create a new file in /etc/nginx/sites-available called mydomain.com.conf. This is where we’ll place your domain-specific configuration. To make the site enabled, create a symbolic link to your configuration in the /etc/nginx/sites-enabled directory. Here’s an example:

				
					# /etc/nginx/sites-available/statuslist.app.conf
server {
    listen 80;
    server_name statuslist.app;
    root /opt/statuslist/www;
    
    location / {
        try_files $uri $uri/
    }
}

cd /etc/nginx/sites-enabled
ln -s statuslist.app.conf ../sites-available/statuslist.app.conf


NGINX Config Test

It’s important to test your config before you reload NGINX. If you have something wrong, NGINX will stop operating and your site will go down. It’s really easy to test your config. Run the nginx -t command and NGINX will print the validation results. See below for an example:

				
					nginx -t
nginx: the configuration file /etc/nginx/nginx.conf syntax is ok
nginx: configuration file /etc/nginx/nginx.conf test is successful


You may also enjoy

Config variables are a powerful tool to control how NGINX routes requests. HTTP request, header and env variables give us precise control on request routing.
The server_name config directive tells NGINX how to route client requests. server_name can match multiple domains, split out requests and work on localhost.
NGINX makes it easy to run Laravel on a production web server. The setup has a few steps, but it's pretty straight forward. Let's get your app into production!
Learn to set up the NGINX status page with for real-time server performance monitoring and seamless integration. Let's get your status page up and running!
It's important to test your NGINX configuration to prevent downtime. Fortunately it's really easy to test your configuration before reloading.
NGINX is fairly straightforward to install and provides a lot of punch right out of the box. Let's dive in and get started!